Now that I hear that the tone is going to be good, I start to proceed with a number of other tangents which were effectively waiting to see if it passed the first test. One of these, is design of the pickups. The whole reason I have used the strings that I have, i.e., iron throughout, no brass, is so that I can use an electromagnetic pickup with this instrument. Which may not even sound good, it's an experimental idea. (Possibly, "acoustic guitar" style piezo pickups would capture a more natural image of the sound; however, I want (or think I want) that "electric guitar" sound. Perhaps both types of pickups will be useful.)
I took a first concrete step: ordered a 1/2 pound roll (2430 feet) of 32-guage magnet wire, from All Electronics (.com). I will have to experiment with magnets and pole-pieces (nails or screws?), and see if I can come up with an easy-to-execute design. I'll probably build some kind of jig to help me wind the coils; whether there will be a coil-per-note, or longer "rectangular" coils around groups of polepieces, like in some guitar pickups: I don't know. And initially, I was picturing making something akin to a really wide single-coil guitar pickup, regardless of the number of coils. But I suspect a "humbucker" would make a lot more sense, since guitars with single-coil pickups are already invariably a hum problem, and this will have 10 times the "antenna" size. Getting a *usable* signal may be quite a challenge.
Friday, January 24, 2014
stringing completed

Well, I now have all the strings in place, 49 pairs. No sign of trouble from the frame under this tension, so far... Of course, this is the minimum tension that I might want it to handle: I've started out tuned to "C", i.e., two whole steps below the max pitch ("E"). I have to decide if I really want to stick with this rather extreme under-tuning, or whether I want to move up to, say, at least "D". But I don't mind breaking-in the instrument on the low pitch, anyway. (Don't really like that word, "break"...)
You can see that I placed felt "bowties" at the hitching points of the strings. These are to mute the "Aliquot" effect, the (dissonant) ringing of the short ends of the strings, which are not supposed to be part of the "speaking length". I hope that this "bowtie" design will hold up over time. The rectangles of felt are stuffed in between the pairs of strings, kept in place by a hole in one end of the felt which goes over the hitch-pin. Thus, even as the felt ages and shrinks, there should still be excess pressure keeping material pressed against the strings. As opposed to the common technique of lacing a long ribbon over and under, through the strings: over time the loops of ribbon tend to sag away from the strings, leaving some un-muted.
(I haven't done anything (so far?) about the even-shorter lengths between the nut and the tuning pins. These aren't as close to some of the real notes, as the other segments were, and plus I'm more concerned about the segments that are in contact with the bridge and soundboard.)
Now I can start to get a sense of the overall tone that the instrument will have, the balance of the lows and the highs, etc.. I'd say, so far, that I love the tone of the basses and I'm very excited to use those tones, they are exactly what my music is wanting. The middle range is also excellent, very woody and cello-like, lots of resonance. I think I made the larger of the two sound holes, too large. I will have to experiment with different reducing baffles over it, before I build another one of these. The voicing of the "vowels" in the midrange, is too "open", I wanted more nasal. But it's acoustically impressive; I expected that nasalness would be easy to attain, but loud round resonance might be lacking, but it's almost the opposite.
The treble, however, does not please me that much, so far. Maybe it's just because the tuning is so far off, the noises are always off-pitch caterwauling horror-movie sounds. But even so, I can still tell that the bass and mid sound good. The treble is too fluty, too plain, too much sounding like the strings are too short and too thick. Maybe this is the area where there is a detrimental effect to the two-step under-tuning. Maybe it will improve when I can access these notes with a real keyboard, and when they have articulating dampers. But then again, maybe "treble that please me" will turn out to be an ongoing quest.
(Another of the many possibilities for why the treble doesn't satisfy, which I should certainly acknowledge, is that maybe this is a result -- the "cost" -- of having too thick, or too absorbent, of a soundboard. My Home Depot plywood soundboard seems to work amazingly well for the bass and midrange, but maybe the treble is where a thinner, solid-wood, soundboard would show its difference. Since others will surely speculate thus, let me do so as well! Has some acoustic basis... Or maybe a million things about the bracing, etc., etc....)
Now begins the long process of gradually bringing her into tune. Unsurprisingly, the tuning of the existing strings was sagging about a whole step per day, as I gradually added more strings over this past week. I expect and certainly hope to see this gradually stabilize, now that all the tension is applied. If not -- I can cover it with glass and it'll make a really unique coffee table!
Monday, January 20, 2014
beginning the stringing process
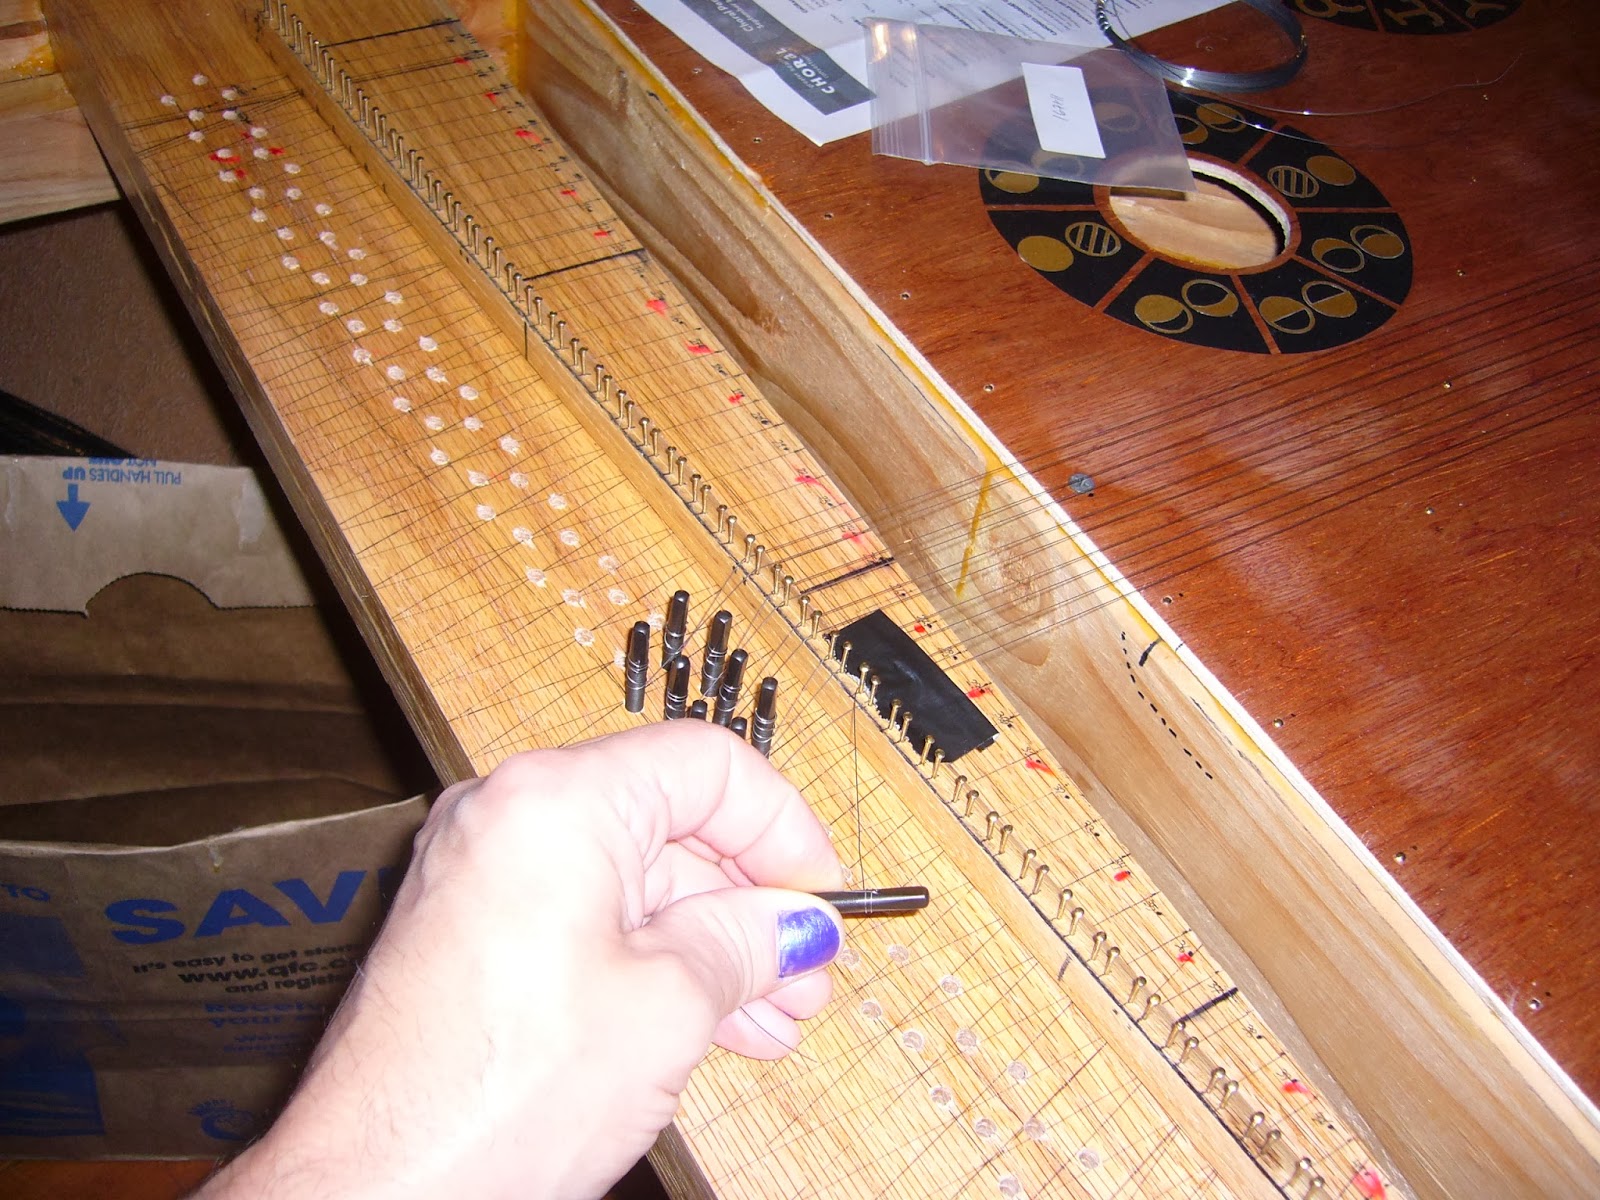
Drilling the holes in the wrestplank out to the final 3/16". As you can see, I used a piece of duck tape with a hole in it, to try to minimize wood shavings falling down into the holes. The drilling went quite smoothly; the guide holes worked such that there was no ambiguity as to the angle of the drill, and hitting bottom of the guide hole was quite clear, there was no danger of wandering deeper with the 3/16" drill. So I think all the holes ended up quite consistent, in the positions which were determined by the drill press.

Hammering in the hitch-pins (just slightly-tougher nails). I placed them by-eye, not so much for consistent appearance but so as to meet the condition that all the strings have between 10 and 20 degrees of side-bearing, centered around the average of 15 degrees. So they look kind of haphazard, but each one is, I think, in the (a) correct position. The haphazard appearance is in a way intentional: I want to emphasize that high precision is not needed here. Nailing into my nice, wide 2x4 "hitch rail" has plenty of room for error. The design removes a requirement for exactitude here.

Using one of my little cardboard guides, to make sure all the hitch-pins are hammered in to the same height.

Stringing up this instrument, so far, has been a breeze, as I hoped and planned. The "double stringing" (i.e., two strings from each hitch-pin) means that I don't have the tedious job of making a twisted loop at the end of each string. Instead, the procedure is, tape down one end of the string at the wrest-plank, allowing enough extra length to wind around the tuning pin several times.

Then run this wire up, over the bridge, around the hitch-pin, and back over the bridge and back to the wrestplank, forming a parallel pair of strings. A piece of duck tape on the nut holds both wire ends in place, so that the wire can be cut (just like I do with guitar strings, I grip with needle-nose pliers and bend the wire back and forth a few times, causing it to break from the stress; this is easier and causes less wear to my tools, than actually cutting the wire).
I wind the extra wire length onto the tuning pin, holding the pin in my hand, before it is inserted into the wrestplank. The first couple windings go over the bent end of the wire, pinning it down tightly against the side of the tuning pin. Then I angle the windings downward so that the final windings come off near the bottom of the pin (i.e., near the bottom of the portion which will be exposed after hammering it in, which is more towards the middle of the overall pin), to give an adequate amound of down-bearing force at the nut. (For the tuning pins which are closer to the nut, I end the windings higher up on the pin, so that the down-bearing angle is approximately the same for each string in the pair.) Once the wire is wound up on the pin snugly, I fit the end of the pin into its wrestplank hole, and pound it in with about 10 blows from my small hammer. I.e., nothing subtle here, the pins are pounded in pretty good. The oak works just fine as a wrestplank, as far as I can tell. There is plenty of friction, no tendency for pins to slip, yet the tuning is easy and smooth, I don't seem to find places where it jumps from too-low to too-high and such.


I'm up to 17 notes now, or 34 strings: just about one third of the total tension. No horrible cracking noises yet!


Thursday, January 16, 2014
sealed!
OK, the soundboard is glued in. No turning back now!
I put the instrument up on its spine side, to blow the dust out of its soundbox cavities, before covering them over for good.

There were 16 "decorative" nails to be placed, marking the positions of the soundboard braces. I did these while the soundboard was still unattached, so that I could hammer into the braces while they were resting against the floor. I drilled down to a depth of 1/2" using a drill spacer as you can see, then hammered the 3/4"-long nails in the rest of the way: which caused them to very slightly break through the bottom surfaces of the braces. So the pre-drilling to avoid splitting was probably especially important.

My fine little jewelry hammer has been just right for all the hammering jobs in this project so far. Putting in the tougher steel hitch-pins may wreck it for any future jewelry career, however.

Last chance to see inside. Here's the glue-bead, waiting for me to place the soundboard on top and then hammer in the 106 "structural" nails...

...Which took quite a while, most of an hour; so I was glad that the Titebond II tends to stay workable for that long, especially in low-air regions where copious amounts have been used, as here.


122 nails, total. And then there will be 49 hitch-pin nails. And there are 196 nails already, between bridge-blocks and the nut. That's approximately... a lot!
Wednesday, January 15, 2014
lotsa nails...
Almost, almost ready to glue this soundboard down. You can see that I sanded away the polyu finish which I had failed to tape-mask for, on the underside of the soundboard where it meets the main diagonal brace, in between the two sound holes.

And I hammered-in some large number of 3/4" #18 brass-plated nails (same as I used for the bridge and nut pins -- the hitch-pins, however, will need to be a different type of nail). Just far enough to get them started, so that I can quickly drive them home once I glue the soundboard down.
"The Instrument is the Go-Deck."

Tuesday, January 7, 2014
back in the shop
Now that the pandalon has had enough time drying outdoors, after the application of its polyurethane finish, I have moved it back to "the shop" (i.e., my apartment). I've been letting it sit, mostly, to get its humidity acclimated to Seattle indoor winter humidity -- which is lower than outdoors, but not that low, unless you have forced-air heat which we don't.
One little task I did, was to mark the positions of the soundboard nails; I marked with Sharpie, then made starter holes (not all the way through) by tapping a nail. The holes are spaced a little closer than every 2 inches, around the perimeter. Also, I will place "decorative" (but informative) nails to mark the locations, underneath, of the soundboard ribs and the main diagonal brace. This will help in analysing effects of the ribs on the sound, and will also help other interested people understand how it's constructed, internally.
In the photo, I have laid brass nails flat in the "decorative" positions, showing where they will go once the soundboard is glued down. I'll undertake this next big step, once I return from travel in a week.

Can you see the nails? A diagonal line between the sound holes marks the main diagonal brace (the portion which is not carved away and thus contacts the soundboard). Then a longer diagonal at about right angles to the first, just to the upper right of the sound holes: this is the longest of the three ribs. Then if you look really closely, you might be able to make out the lines of the two shorter ribs, back towards the tail of the instrument (but probably it helps to know ahead of time where to look). These two ribs pass "under the bridge", although in fact they pass in between bridge blocks, not right under any block. Still, ribs under the bridge is a dicey proposition, not seen much on the "later" instruments (i.e., 18th century) which are more or less accepted as the pinnacle of tone design nowadays. But I've got my reasons! Tapping around on the soundboard, it is easy to find where the ribs are, they have a definite effect of diminishing the responsiveness, especially the bass of course. But, the sound doesn't go dead completely, far from it; and a tone which accentuates the treble is my aim. So, we'll just have to see (and hear)...
One little task I did, was to mark the positions of the soundboard nails; I marked with Sharpie, then made starter holes (not all the way through) by tapping a nail. The holes are spaced a little closer than every 2 inches, around the perimeter. Also, I will place "decorative" (but informative) nails to mark the locations, underneath, of the soundboard ribs and the main diagonal brace. This will help in analysing effects of the ribs on the sound, and will also help other interested people understand how it's constructed, internally.
In the photo, I have laid brass nails flat in the "decorative" positions, showing where they will go once the soundboard is glued down. I'll undertake this next big step, once I return from travel in a week.
Can you see the nails? A diagonal line between the sound holes marks the main diagonal brace (the portion which is not carved away and thus contacts the soundboard). Then a longer diagonal at about right angles to the first, just to the upper right of the sound holes: this is the longest of the three ribs. Then if you look really closely, you might be able to make out the lines of the two shorter ribs, back towards the tail of the instrument (but probably it helps to know ahead of time where to look). These two ribs pass "under the bridge", although in fact they pass in between bridge blocks, not right under any block. Still, ribs under the bridge is a dicey proposition, not seen much on the "later" instruments (i.e., 18th century) which are more or less accepted as the pinnacle of tone design nowadays. But I've got my reasons! Tapping around on the soundboard, it is easy to find where the ribs are, they have a definite effect of diminishing the responsiveness, especially the bass of course. But, the sound doesn't go dead completely, far from it; and a tone which accentuates the treble is my aim. So, we'll just have to see (and hear)...
Subscribe to:
Posts (Atom)