Tuesday, April 29, 2014

prototype action parts

Fabricatin' a whole bunch of small wooden parts, in order to build a small set of prototype keys, before I commit to building the full keyboard and action.  I have built a smaller action of this type, for my 15-note zither, so this is in some ways my second pass at this kind of mechanism, and I'm using lessons learned already (particularly, I'm using a lot more motion ratio this time, about 5:1, and my keylevers are longer and thinner than those on that first clunky little prototype).  But many things are being tried for the first time here.

There are my strikers, square-section basswood.  I made four but then ended up only building out three of the keylevers, later on.  One of the remaining three strikers, I have "sized" with Titebond II glue on the angled striking surface.  I left the other two plain wood.  I am planning to, probably, size all of the strikers on the real action; but I want to see what difference it makes, whether perhaps the plain-wood kind will split or wear down much faster.  I suppose, if it makes no perceptible difference, then why do the sizing.

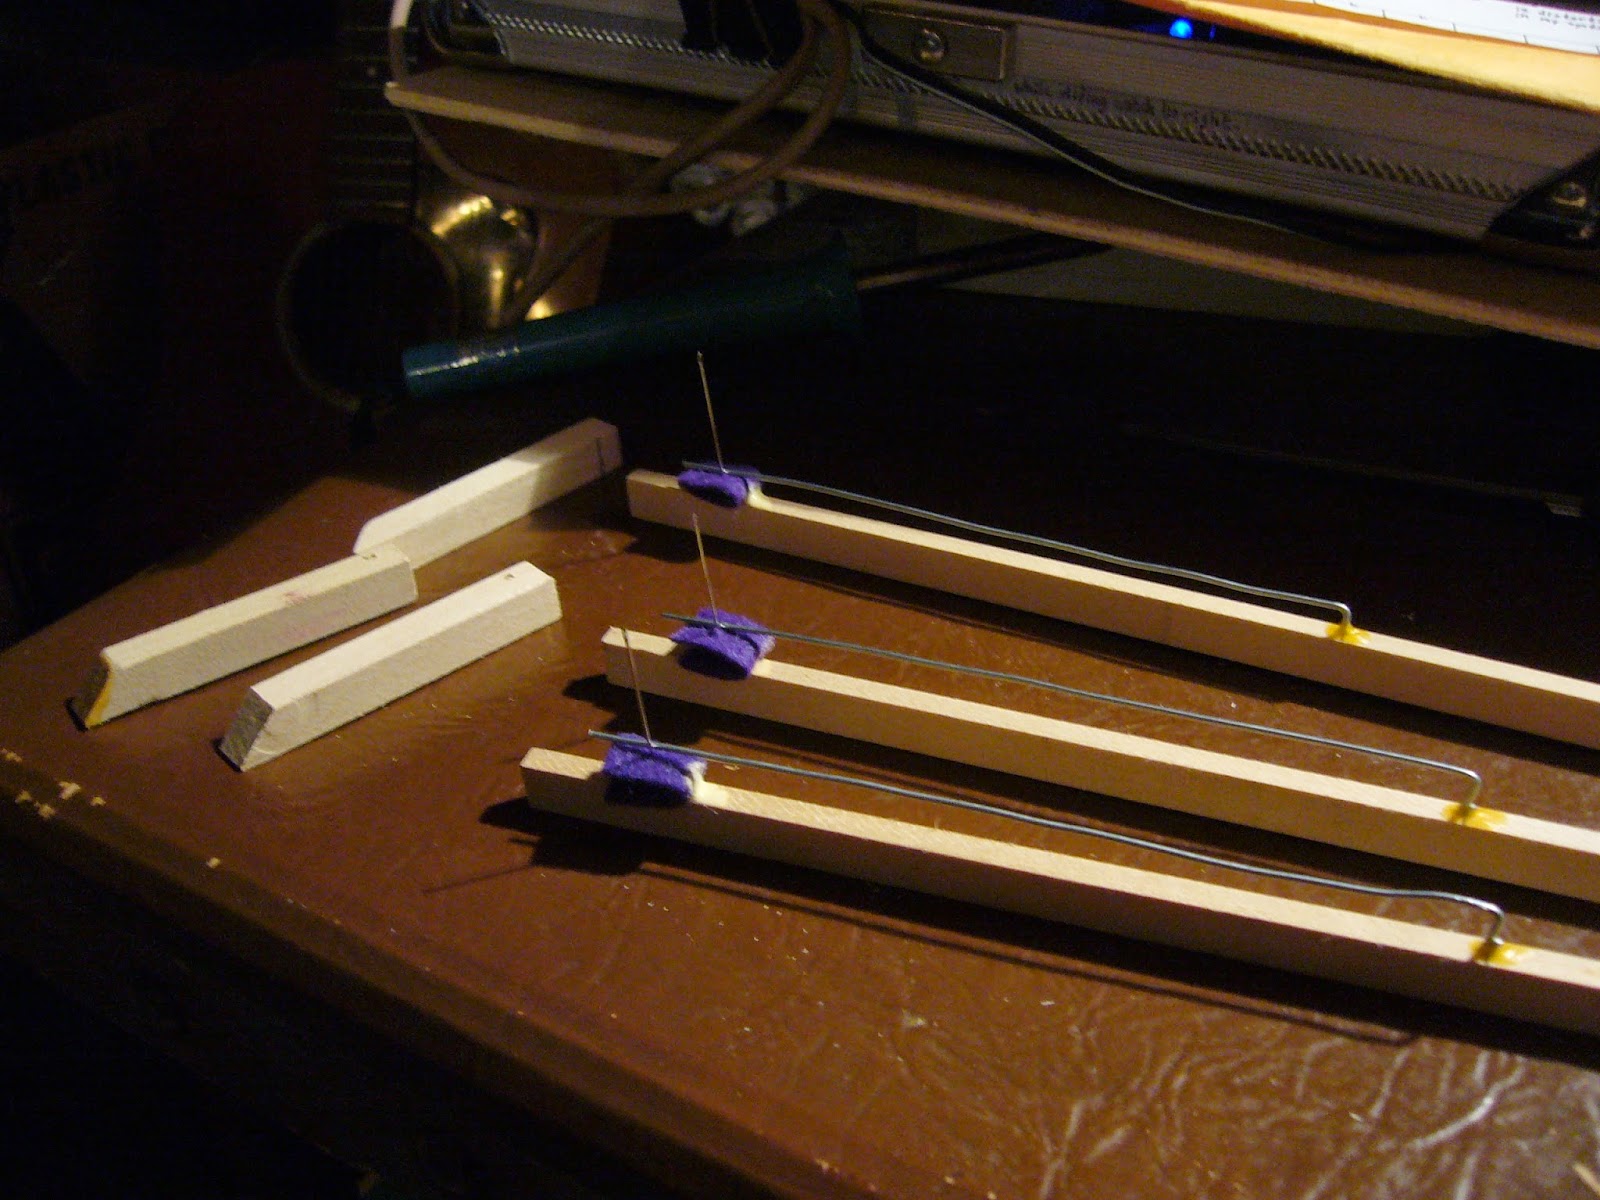
Here you can see the 12" keylevers, with the eye-hooks already in place.  These will adjust the dampers.

Here I have the strikers sitting in place on three keylevers, but on the fourth you can see the sewing needle which acts as a guide for the strikers.  The strikers are drilled with a long vertical hole, about 1.5" long, through the center, for the needle; and then they also have a horizontal hole all the way through from front to back, slightly offset so as not to intersect with the vertical hole.  This latter is for the spring wire.

Here you can see the spring wires in place.  I'm not sure about the mounting technique here: because the keylevers are such thin, narrow wood (which is good, for lightness of action), I can only drill a very shallow hole in the top for the folded-over end of the spring-wire to seat into.  It's a marginal-enough situation that I sealed each one with a dab of Titebond glue, as you can see.  Overall, that seems to result in a functional attachment, but it might be more secure (and easier to fabricate the springs, in addition) to have the spring-wires go straight into a short block of wood glued on top of the main keylever, instead of making the 90-degree bend.  This is the kind of stuff that building these prototype keys helps me figure out...

Here you can see the front keylever guide, close-up (the keylevers in the background are foreshortened).  Each keylever has a hole drilled near its bottom edge (1/16" diam), which the #16 steel wire passes through, forming the pivot point of the lever.  Then the keylevers also pass in between the shiny nails (#8d finish nails, 2+1/2", 7/64" holes drilled for them), which guides the keys in a similar fashion to standard keyboards, except that usually, standard keyboards will have center pins instead of guides on the sides like this.  The standard way is possibly quieter; this way is much easier to fabricate (especially with these unusual, slender keylevers).

The keylevers also pass through a similar nail-fence guide, the rear guide, about 7 inches farther back from the pivot point.  On the prototype, this guide is fixed, but on the real action, it will be able to raise up and down, thus adjusting the bottom travel limit of the keys.

Much more critical than the bottom travel limit, is the top travel limit.  On the real action, the limits will be adjusted with screw-threads.  For the three-key prototype, I just used a 1/4" dowel, which fits nice and snug in 1/4" drilled holes (one end glued), with enough friction to stay in place, but still can be adjusted pretty easily.  This top travel limit is the whole key to my action: the key swings up until it hits the limit and stops suddenly; the striker keeps traveling, lifting off of the key surface and flying upward to collide with the pair of strings, before being returned by the striker-spring.  The top limit is adjusted to bring the strikers very close to the strings, without actually touching them, when they are just sitting on the raised keys.  Thus, only a light touch on the keys is needed to make them sound at maximal "piano", but they still get out of the way of the strings and don't make buzzing or second-sounding errors.

And here I am gluing on the felt.  The upper and lower limits have felt, and also the strikers are seated on felt, on their respective keylevers.  Thus everything operates as quietly as possible, and also, critically, the tendency of the striker to rebound after hitting the string, is minimized: which permits closer adjustment of the upper limit and thus more-sensitive "piano" playing.


Here's the whole deal (well, no dampers yet, that's next).  Enough to finally actuate the strings in the way that they will be actuated, and thus, I can finally hear her "real voice" in a very definite sense.  Exciting!

...Meanwhile, work also continues in parallel, on the software for the "tuning fork", which will let me finally put the thing into good tune and see how well it holds.  All I can say so far is, the bottom strings have held their C2 for several months with no apparent trend, although they track humidity up and down.  So the basic holding of the tension is successful.


Tuesday, April 22, 2014

more keyboard stuff...

Here's the wood I've purchased for the keyboard and action parts.  All bound up in a bundle, to try to keep stuff from warping too much.  Basswood: pretty light wood, easy to machine, similar to balsa but in fact much denser than that.  Several different dimensions (all 24" long), for the strikers and such; the keylevers themselves will be 3/8" x 3/16", and 12" long.  Which is quite thin, I hope they are strong enough, especially after the several necessary holes are drilled through or into various places on these thin strips of wood.  The intent is severalfold.  For one, I hope that the thin and light levers will have low mass and low inertia, so that as much as possible of the acceleration work done to the key by the finger, is transferred to the strikers, which the keylevers fling (*) into collision with the strings.  The strikers are basswood too, but they are of thicker dimensions, and they are necessarily pretty long to clear the wrestplank (about 3" long), so they've got some mass.  I think I will probably "size" the strikers with Titebond glue, to try to prevent splitting; if they split anyway, or wear down quickly, or otherwise fail to cut it, I may have to try other, harder, woods for this.

Here I've started laying out the hole-markings for a set of four prototype keylevers, which I will construct to test out my ideas before committing to the full 49-key keyboard.  Among many important parameters to verify, the most important is the "fulcrum point", i.e., where to drill the hole that a thick steel wire will pass through, forming the pivot point of the key-lever.  If it were right in the middle, the key would be approximately balanced, and the motion ratio of striker to key would be about 1:1.  However, I want a higher motion ratio, and I want the keys to have a positive gravity return, so the fulcrum will be located closer to the keys (i.e., the front end).

After all the complicated motions in the action of a modern piano, the effective motion ratio (as near as I can tell in my readings) usually works out to be around 5:1.  So I take this as my upper practical limit, and I figure that I'll probably get some kind of satisfactory operation at lower ratios, too.  Initially, I was planning to try about a 3:1 ratio first.  But when I started laying out the keys, having already started to develop some intuitive sense for how they might operate, I just said what the heck and went for a higher ratio: my fulcrum point is at the 2" position from the front end of the 12" keylever, which would indeed imply a 5:1 ratio.  In actuality, the ratio will be lower because the key surfaces extend more than another inch beyond the end of the lever, and also the striker is located an inch away from the back end of the lever, i.e., at the 11" position.  (I measure all the distances from the front ends, to nullify inaccuracies both in the original nominal 24" length, and in my cutting down to 12", which can be up to 1mm or so, it seems.)

...Meanwhile, I've continued experimenting with arcade-cutters.  My first one was promising, but it cut a little bit rough and also I thought the profile of the arcades produced was too deep.  So I made a second one, with a shallower cutting slope.  I had figured to file the cut edge to make it sharper, but actually the way I happened to position it when initially clipping the "ears" off with my mega-bolt-cutters, left a nice sawtooth bevel to the edge, facing the right way to cut in the direction of rotation.  I guess the first time, this bevel ended up facing the opposite way.  So, I just used my smaller tinsnips to put a few nicks of different depths into the sloped cutting edge, to produce the curved arcades.

Here I go, cutting this new arcade pattern into a poplar 1x2.  I'll dice them up later: a little rectangle of wood containing only the top half of the circular pattern, will go on the front of each natural key.

Here, you can see the trapezoidal profile of my cutter, in the drill chuck.  The almost-horizontal sloped edge is the cutting edge.

...And here are my four prototype keylevers, taking shape.  Now I have drilled the 1/16" holes and threaded them onto #16 steel wire, which through no coincidence happens to be a nice tight fit.  I "ease" the fit by bending the keylevers back and forth, but *not* up and down, thus giving enough looseness to pivot freely on the wire, without sacrificing the wire's ability to prevent the keylever from rocking back and forth on its long axis: which would cause the top ends of the strikers to move back and forth and interfere with each other.  If the strikers still have too much side-to-side motion, I'll have to run them through a guide, but I'd like to minimize such sources of friction, especially in the region where motion will be 5x accelerated.  (Side-to-side angling of the keylevers is not a problem, because they will be passing through guides, consisting of vertical "combs" of shiny nails, which constrain this motion.)

The brass eyehook thingies on the tops of the levers are for adjusting the damper heights.  The dampers will come from underneath, just like the strikers, and they will be held in position by (globally adjustable) spring force.  When a key is pressed down, it pulls upward on a pair of nylon monofilament ("fishing line") cords, which pass across two "pulleys" (possibly not moving parts, just smooth metal wire for low friction) and then pull the damper downward, against spring force.  The monofilament attaches to the keylever via another drilled hole, which is located close to the fulcrum (1" away in the present design).  Thus, the motion of the damper is at a low motion ratio, not the 5x of the striker.  This reduces the spring force felt at the key, relative to how much is needed to be effective at the damper location.  And it prevents unnecessary acceleration and travel of the dampers, which only need to move a fraction of the distance covered by the striker.  And finally, it allows the dampers to come-from-beneath, which enables the entire action unit to be removed easily for service and adjustment: especially important given that my keylevers and "jacks" (strikers) are not separately-removable "in vitro", as they would be in a conventional harpsichord.

...So anyway, the eyehooks enable the monofilament to be "reeled in", thus setting the height of the dampers (or more precisely, they set the point in keytravel at which the dampers start to move and un-damp the string, which will critically affect the nature and feel of the articulation).

Just playing upon the raw keylevers like this, with my fingers, I can tell that the high motion ratio is good, I like how fast it makes the striker ends move, yet the levers are light enough that it doesn't feel like a harsh task to set them in motion, despite the leverage.  I can play trills and repeats without lags or stutters.  These levers are, by design, much more similar to the long, thin hammers that would be used with a hammer-dulcimer, than to anything you'd find under the hood of a piano.

Tuesday, April 8, 2014

starting on the keyboard

The frame (or "harp") has been under string tension for a couple months now, without doing anything terrible.  I have started to assemble the necessary materials to build the keyboard and action.

I found these great glass-covered tiles, the white rectangles in the pic, which will I think be perfect for the sharps.  I was considering using the black square tiles you see, for the fronts of the naturals (and plain black wood for the rest).  But the black tiles are slightly too wide.  I'd have to grind them down on two sides, to make them fit in the necessary spacing without touching.  Before I get into ceramic-grinding, I'd rather find something that fits off-the-shelf.  Or, make something...

Here you can see the little thumbscrew thingie which I have turned into an arcade-cutter.

And here it is again, after clipping its wings off asymmetrically, and scoring the wider-angle side so that it cuts a nice pattern of grooves.  This will be used to cut "arcades" in the front edges of the keys: another small bit of decoration which I allow myself, on this essentially ugly-but-functional prototype instrument.  (Partly, of course, I am just developing the decoration techniques for later use, and this instrument is the guinea pig.)

Here is the plywood jig I have made, for rolling out flat slabs of clay at a consistent thickness.

Only Duck Pond 2002 Chardonnay bottles will work for this, they are made of a special glass which resonates with the molecular structure of the...

A nice slab of clay, rolled out and ready to become an octave of natural keys.  This is "Della Robbia" oven-bake clay.  After air-drying for a week or so, you bake it in the oven at low heat (like 200F), and hopefully it ends up hard enough to be the covering of natural keys!  Or not...

I used laser-printed templates, both to initially cut the key shapes (I used a matte knife), and then later to trim the partially-dried keys to final shape and size, by comparing with the lines on the template underneath.

Here's the first of the four octaves, trimmed and ready to dry for a few days.  The other three are waiting for trimming in the background...

...However, since it was then time for me to go attend to other aspects of life, I stored the other untrimmed octaves in plastic containers, with moist paper towels in there.  I hope this keeps them pliable until I get back to them (within a day).  Looks like a big batch of yummy fudge!